How To Maintain Vendors Account
To Maintain Vendors in Peachtree we open an existing company and then click on the Maintain menu which is in the above screen of the Peachtree software.

We then Select the 2nd option that is Vendors… as we want to maintain Vendors.

By selecting the Vendor… option the following screen will be appeared in the Peachtree software.

In Maintain Vendors Menu we maintain the records of our vendors by giving them ID and Name and provide the information of the vendors which includes there General Information, Purchase account to use each time we post a purchase from the vendor, and custom field information. We can also view historical information about our purchases from the vendor for the previous 12 months.
Similar to the Customers before we save the ID of the Vendor and Name of the Vendor we first have to record the Purchase Account which is on the Purchase Defaults Menu.

As mention above we first go to the Purchase Default menu and then we click on the option by doing this all the accounts which we have created in Chart of Accounts appeared in the screen as shown below
option by doing this all the accounts which we have created in Chart of Accounts appeared in the screen as shown below
We select Inventory account from it and then double click on the Inventory so that the account will be appeared in front of the Purchase Account now we are able to save the Vendor’s Name and ID. But this whole process will be done before every time we want to save the New Vendor information. If we do not record the Purchase Account and try to save the Vendors ID and Name of the vendor and other information about the vendors the software will give the following error so to avoid this we first have to record the Purchase Account.

To avoid this error we can save the Purchase Account and choose a Inventory Account for Purchase Account and save it in the Vendor’s Default Account, so that we will not need to select an account for Purchase Account every time in order to save New Vendors Information.
After selecting Purchase Account we then enter the Vendor ID and Name of the Vendor. The ID of the Vendor may be the name of the Vendor but we here take Vendor ID as 100. We then enter the Contact Number of the Vendor through which we can contact the vendor then Account No. of the vendor, His/Her Address, City, State, Zip Code, Country Name of the Vendor, Vendor type,1099 Type, Telephone Number, Fax Number, E-mail Address and Website Address of the Vendor.
Vendor Type are used to categorize vendors for reporting purposes. For example, we want to distinguish between vendors who supply us with inventory and vendors who provide overhead services such as telephone. The text we enter in the Vendor Type text box can be up to eight characters long. Entering a vendor type is useful because we can limit some reports to specific vendor types.
1099 Type: Peachtree’s 1099 utility allows you to print end 1099 forms for 1099-type vendors. The total amount of cash paid to a vendor for the entire calendar year is the amount that prints on the 1099 form. 1099 forms are required for independent contractors that have received payments from a business and also for vendors that have received interest payments. Both the 1099-MISC and 1099-INT preprinted forms can be printed in Peachtree Accounting. The forms can be obtained from Peachtree Checks and Forms. According to Internal Revenue Service (IRS) rules, you must issue a 1099 to a vendor who is an independent contractor if the contractor is not incorporated and you pay $600 or more per year to that vendor. Peachtree can print 1099s at the end of the year for vendors you designate as 1099 vendors. Sales representatives might be considered 1099 vendors, based on the IRS definition of employees and independent contractors. This 1099 Type is based on American System so we can not use this in Pakistan.
E-mail and Web Site: Both e-mail and Web addresses are interactive, So, if we give the vendors e-mail address and click the icon next to the e-mail text box, Peachtree opens our e-mail program and starts a message to the vendor. Similarly, clicking the button next to the \web Site text box launches our browser and directs it to the vendor’s Web site.

Beginning Balances: By clicking on the Beginning Balances we can enter unpaid bills we received from Vendors before we started using Peachtree. Technically, we can enter as many beginning balances bills we want for an individual vendor; however if we exceed 100 bills, we can enter but not edit or delete any information for the 101st bill and onward bills. If we click the Current Balance button, Peachtree displays the Vendor Ledger report for the current vendor’s balance as of the specified date.
We After filling General information about the Vendors go towards the second Information link that is Purchase Defaults and is shown in the following screen.
In this we record the information of Purchase Representative, Purchase Account, Tax ID Number, Ship Via, Terms and Delivery Method. Purchase Representative: An employee can serve as a purchase representative.
Purchase Account: As we mentioned in start of this topic that we select Inventory for Purchase Account and without selecting Purchase Account we will not be able to save the Vendor’s information.
Tax ID #: If the vendor is a 1099vendor, supply the vendor’s Tax ID number, which eventually appears on the 1099 will be written. In Pakistan Tax ID Number is not used.
Ship Via: After it we select a shipping method from the Ship Via drop-down list. In ship via we record the method we are going to receive the inventory.
Terms: 2/10 n/30 is the standard term which Is used when we give discount to any one which means if we pay the amount with in 10 days we can get 2 percent discount otherwise we have to pay the full amount in 30 days. We can change the Term by clicking on the  button the following screen will be appear when we click
  on the button.
button the following screen will be appear when we click on the button.
We can change the Standard Terms by un checking the Use Standard Terms and can change the Discount Term
.
Form Delivery Option: We then select the Form Delivery option i.e. weather we are using e-mail or paper form in this regard.
After completing the Purchase Default Information we move towards the Custom Fields Tab the tab is shown in the following screen

On the Custom Fields tab, fill in the information about the Vendor we can change these Field Labels and can be enabled on the vendor default window. In the above we fill the Information about the Vendor’s Office Manager, Account Representative and Special Note.
We after completing Custom Fields go to the option History of the vendors the Vendors screen is shown in the following screen

We then saving all the Information regarding Vendors can record the Beginning Balance of the Vendor and the procedure for recording beginning balances of a vendor is shown below:
How To Enter Beginning Balance
As we want to enter the Beginning Balance of the Vendor we have to save the ID and Name of the Vendor. We after recording all important information about our Vendors then SAVE the vendors account by clicking on the  button which is shown in the above screen of the Maintain Vendors Menu. When we save the Vendor ID the following screen will be shown in which current balance is also given while when we do not save the ID of a Vendor Current Balance option is not shown.
button which is shown in the above screen of the Maintain Vendors Menu. When we save the Vendor ID the following screen will be shown in which current balance is also given while when we do not save the ID of a Vendor Current Balance option is not shown.
We then by clicking on the option can enter the beginning balance of a customer. As shown in the following screen.
option can enter the beginning balance of a customer. As shown in the following screen.
First we enter the Invoice Number, and then we enter the Date. The date starts with the month i.e. firstly we record month then date and then year e.g. for entering June 20, 2009 we enter 06,20,2009. Then after entering Date we write Purchase order number, Amount and then A/P Account in which we select A/P account from the charts of accounts.
Delete an Existing Vendor ID
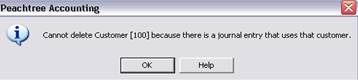
We can delete an existing Vendor Account By selecting the ID which we want to delete and then click on the delete button after selecting the Account which we want to delete. The Delete option is in the above Screen of the Maintain Vendors. But to delete a vendor account the beginning balance if saved for the vendor should be removed from the Vendor Beginning Balance Screen first then we select the customer which we want to delete and then we Delete the vendor if we do not remove the beginning balance we are not able to delete the vendor ID and the following error will be shown

Change ID of A Vendor
We can change the existing ID of a vendor by giving it another ID that is done by clicking on the Change ID option which is on the above screen of the maintain vendor. We first select the Vendor whose ID we want to change we then by selecting the customer click on the  button. The following screen is shown after clicking thebutton.
button. The following screen is shown after clicking thebutton.
We Enter the New Vendor ID e.g. 150 is the new ID which we want to give to the Vendor we write it in front of the Enter New Vendor ID option and then click the OK option that is how we can change our Vendor ID.