31 December 2011

How to Create Sales Invoice


      How To Maintain Sales Invoice

After we actually ship items or render services, a sales order can be applied to a sales invoice. Once the sales invoice is entered, accounting information is entered in the General Ledger (in accrual-based companies). Most businesses generate an invoice as proof of the sale to give or send to their customers. Only one sales order can apply to an invoice. However, we can create multiple invoices from a single sales order.
In order to record the Sales Invoice of a company open the company information in Peachtree software, as the company is opened the following screen appears in the software.


We then click on the Tasks button which is in the above Bar of the software and click on the Task bar menu the following dropdown list will appear after doing so 


From the Tasks menu we click on the 3rd option of the drop down list and that is Sales/Invoicing as shown in the below mentioned screen

By opening the Sales/Invoice window the following Sales invoice screen will be appeared in the peachtree software


The top part of the Sales/Invoicing order window contains header Information such as customer name, address, invoice number, date and other information.

1) The first step in creating the Sales Invoicing is we Type or selects the Customer ID. We are not able to enter the Sales /Invoice in peach tree unless we have maintained the Customers. Peach Tree displays the Customer’s current balance and credit limit in the lower-left corner as shown in the following screen.


We then select the Customer from our Customers which will be shown by clicking on the Customer ID magnifyingButton list or by pressing the plus (+) key while the insertion cursor is in the Customer ID box or we can also open the customer ID drop down list by double-clicking inside the Customer ID field so that all the Customers will be appeared in the drop down as shown in the below screen

2) The Second step is to enter the recipient Ship To address, we click the Ship To arrow and choose the Bill to address or one of the Ship to addresses we entered when we setting up the Customers Default. Peachtree does not store a manually entered ship to address permanently in the customer record. The Shipping Address is shown in the following screen


3) We after selecting the “Ship To” then move to the next step in which we enter the Date in which we are sending the goods to the customer. We can select the date through the calendar which is shown in the following screen


4) Leave the invoice number blank if we want Peachtree to assign an invoice number when we print the invoice. Inventory item numbers on a sales order can’t be edited from an invoice. To change item numbers, we must edit the original sales order. We can, however, change the quantities or item description. To add additional items or charges to the invoice, click the Apply to Sales tab and add the items there.

5) We then record the Customer PO (Purchase Order).

6) We then after filling the purchase order number then move on the Shipping Method and select the shipping method from the Ship Via list drop down box as shown in the following screen.


7) We then record the Ship Date in which we send the items to the Customers.


8) We then select the Discount terms in which Discount rate we are allowing the customers in which they gets discount. The peach tree allows every Quote a standard discount of 2/10, n/30 we can change the discount rate according to our desire.


8)  We then select the Sales Representative Number.

9)  After that there are main two tables available in the Sales Invoicing the first is Apply to Sales and the second is Apply to Sales Order. When we open a Sales Invoice window we are in the Apply to Sales window and we can edit this if and only if we have entered the data of Sales order in the Sales Order window the detail about both are given as follows:


Apply to Sales Order: When we select a customer who has open sales orders, the Apply to Sales Order tab displays, allowing us to select which order to receive items against.

Apply to Sales: If we select a customer with no open sales orders, this tab displays. You can enter a direct sale that did not originate on a sales order or quote. In addition, even if you have selected a sales order and shipped items against it on the Apply to Sales Order tab, you can also select the Apply to Sales tab to enter additional sales not included in a sales order.

We select the Apply to Sales Order No. or Apply to Sales from the drop down list . Remember thelist shows us only the accounts which we made earlier in the making of Quote and Sales Order time. We then select the No. the following screen will be appears


10)  After that if we are selling any inventory item we then select the Item ID of the item from the list which we maintain in the Inventory Items. Peach tree fills in the Item Description, the Remaining and Shipped items, its Description and item’s unit price, and the Tax status. Then it multiplies the quantity times the unit price of the unit price for the total amount. We fill the given information shown below if the screen


After filling it we then click on the Save button or press Alt + S button to save the Sales Invoice.

Sometimes the software shows the error


Which says that this invoice will cause the Customer Balance to go over the Credit Limit by --------? Is this OK? If we set this in the default setting then the error will not be shown but if not then it will be shown while we want to save if we exceed the amount so in this case just enter the OK button so that the Sales Invoice will be saved.

24 December 2011

How To Maintain Sales Order In A Peach tree Accounting Software


Maintain Sales Order in Peach Tree

Sales orders are used when our customer agrees to a sale, but we are not prepared to ship or invoice all or part of the order. The service or inventory items are ordered for the customer—either packaged by our shipping department or issued to our staff to schedule services. Once we issue a sales order, prospects are converted to customers. After we actually ship items or render services, a sales order can be applied to a sales invoice. Once the sales invoice is entered, accounting information is entered in the General Ledger (in accrual-based companies). Quotes and sales orders are not posted to the General Ledger. Why should we use sales orders? Why not just create an invoice? Well, this choice is really a matter of timing. If our business receives a customer order and ships the product or provides the service within a day or two, we should skip the sales order step and wait to enter the invoice. If there is a delay between the time we take the order and the time we provide the product or service, however, we may find the sales order feature helpful. The sales order feature lets us enter items for a customer and then invoice and ship the items as they become available, tracking the backorders in the system. By viewing inventory and sales order reports, we know the number of items backordered for our customers, which can help us plan purchases from our vendors. Even though we reference G/L accounts when we create a sales order, Peachtree doesn’t update the general ledger until we create an invoice from a sales order. We may find entering data in the Sales Order window similar to creating a quote. To create a sales order, follow these steps

We first open an existing company on peach tree after opening an existing company the following screen will be appeared


 We then click on the Task Menu which is shown in the above screen of the Peach tree as shown below


We then click on the select the first option from the Task menu and that is of Quotes/Sales Order option by clicking on the Quotes.Sales Order option the following screen will be appeared


 We then click on the Sales Order Number button the following screen will be appeared


 The top part of the sales order window contains header Information such as customer name, address, quote number, date and other information.

1) The first step in creating the Sales Order is we Type or selects the Customer ID. We are not able to enter the Quote in peach tree unless we have maintained the Customers. Peach Tree displays the Customer’s current balance and credit limit in the lower-left corner as shown in the following screen.


We then select the Customer from our Customers which will be shown by clicking on the Customer ID magnifyingButton list or by pressing the plus (+) key while the insertion cursor is in the Customer ID box or we can also open the customer ID drop down list by double-clicking inside the Customer ID field so that all the Customers will be appeared in the drop down as shown in the below screen


If we want to maintain a new Customer ID we then click on thebutton which is in the drop down list. We then repeat the step of Maintain Customer ID to maintain a new customer and the following screen of the Maintain Customer window will be appeared in the screen of the peach tree as shown below.


We enter the necessary information of the Customer and Save the detail of the customer in the above shown screen in peach tree and then after pressing the Close button we are back in the Sales Order Screen. We then enter the Name, Address, City, St, Postal Code and Country Name of the customer which is optional.

2) The Second step is to enter the recipient Ship To address, we click the Ship To arrow and choose the Bill to address or one of the Ship to addresses we entered when we setting up the Customers Default. Peachtree does not store a manually entered ship to address permanently in the customer record. However, in peach tree we do store the custom address with the current quote and transfers the address to the resulting sales order or invoice or both. The Shipping Address is shown in the following screen 


3) We after selecting the “Ship To” then move to the next step in which we enter the Date we want printed on the Sales Order and an Expiration Date for the Sales Order. The software assumes that the sales order is valid for a period of 30 days and prints the ending date on the sales order form. If we are giving our customers longer or shorter period of time, we choose a different date in the Good Thru date box ,the date can be entered or selected from the Calendar available in the Good Thru when clicking on the Good Thru option or in the Date option the calendar will be appear we select the date from here or write it, but if we going to write the date manually without using calendar we then enter first the month and then the date and then the year for example for 21st February 2010 we write 02/21/2010 instead of writing 21/02/2010. It is because peach tree is American accounting software so in America this format of writing date is applied.

4) We then enter the SO (Sales Order) Number. Before selecting the So No. keep in mind the following variations
• A sales order does not have a good through field.
• Our customer may or may not supply us with a customer purchase order number (optional).
• If we do not enter a quantity, enter an amount.
• If we are using Peachtree’s job costing, we may have already assigned a job number to the customer order. If so, be sure to indicate the job ID and optionally the phase code and cost code to each sales order line item.

5) We then after filling the SO and PO number then move on the Shipping Method and select the shipping method from the Ship Via list drop down box as shown in the following screen.


6) We then select the Discount terms for the order. The peach tree allows every Quote a standard discount of 2/10, n/30 we can change the discount rate according to our desire.

7)  We then select the Sales Representative Number.

8)  After that if we are selling any inventory item we then select the Item ID of the item from the list which we maintain in the Inventory Items. Peach tree fills in the Item Description, the G/L sales account, the item’s unit price ,and the Tax status. Then it multiplies the quantity times the unit price of the unit price for the total amount. We fill the given information shown below if the screen


After filling it we then click on the Save button or press Alt + S button to save the Quote.

Opening An Existing Sales Order:
To open an existing Sales order we click on thebutton the following screen will be appear

We select the desired account from the list and then by choosing it click on the OK button the Sales Order will then be shown in the screen and we can add any detail or want to do any amendments in it can do it.

How To Maintain A Quote In Peach tree Accounting Software


Maintain Quotes in Peach Tree

Many businesses let their customers know how much a product or service costs them by producing a Quote before the Customer decides to buy. Quotes are basically the proposals which we have given to our customers in which prices and terms for a possible sale are given. This is an optional Accounts Receivable task. Many times we have already established the sale. If so, then we skip this procedure and begin entering a sales order or invoice. Peachtree allows us to create a Quote, when the customer determines he or she wants to purchase we can then convert the Quote to a Sales order or an Invoice.

To Maintain the Quotes we first open an existing company on peach tree after opening an existing company the following screen will be appeared


We then click on the Task Menu which is shown in the above screen of the Peach tree as shown below


We then click on the Task button the following screen will be appeared after clicking on the Task Menu


We then move the cursor of the mouse towards the first option from Task Menu which is Quotes/Sales Order. By clicking on the Quotes the following screen will appears


The top part of the quote window contains header Information such as customer name, address, quote number, date and other information.

1) The first step in creating the Quote is we Type or selects the Customer ID. We are not able to enter the Quote in peach tree unless we have maintained the Customers. Peach Tree displays the Customer’s current balance and credit limit in the lower-left corner as shown in the following screen.


We then select the Customer from our Customers which will be shown by clicking on the Customer ID magnifying  Button list or by pressing the plus (+) key while the insertion cursor is in the Customer ID box or we can also open the customer ID drop down list by double-clicking inside the Customer ID field so that all the Customers will be appeared in the drop down as shown in the below screen
If we want to maintain a new Customer ID we then click on thebutton which is in the drop down list. We then repeat the step of Maintain Customer ID to maintain a new customer and the following screen of the Maintain Customer window will be appeared in the screen of the peach tree as shown below.


We enter the necessary information of the Customer and Save the detail of the customer in the above shown screen in peach tree and then after pressing the Close button we are back in the Quotes Screen. We then enter the Name, Address, City, St, Postal Code and Country Name of the customer which is optional.

2) The Second step is to enter the recipient Ship To address, we click the Ship To arrow and choose the Bill to address or one of the Ship to addresses we entered when we setting up the Customers Default. Peachtree does not store a manually entered ship to address permanently in the customer record. However, in peach tree we do store the custom address with the current quote and transfers the address to the resulting sales order or invoice or both. The Shipping Address is given in the following screen.


3) We after selecting the Ship To then move to the next step in which we enter the Date we want printed on the Quote and an Expiration Date for the quote. The software assumes that the quote is valid for a period of 30 days and prints the ending date on the quote form. If we are giving our customers longer or shorter period of time, we choose a different date in the Good Thru date box ,the date can be entered or selected from the Calendar available in the Good Thru when clicking on the Good Thru option or in the Date option the calendar will be appear we select the date from here or write it, but if we going to write the date manually without using calendar we then enter first the month and then the date and then the year for example for 21st February 2010 we write 02/21/2010 instead of writing 21/02/2010. It is because peach tree is American accounting software so in America this format of writing date is applied. We can select the date through the calendar which is shown in the following screen


4) We then enter the Quote Number which is optional.

5) It is unlikely that customer has given us a purchase order number for a quote. After all, if we are quoting it, it’s not yet a purchase. So we can leave this PO (Purchase Order) field blank.

6) We then after filling the purchase order number then move on the Shipping Method and select the shipping method from the Ship Via list drop down box as shown in the following


7) We then select the Discount terms for the order. The peach tree allows every Quote a standard discount of 2/10, n/30 we can change the discount rate according to our desire. 

8)  We then select the Sales Representative Number.

9)  After that if we are selling any inventory item we then select the Item ID of the item from the list which we maintain in the Inventory Items. Peach tree fills in the Item Description, the G/L sales account, the item’s unit price ,and the Tax status. Then it multiplies the quantity times the unit price of the unit price for the total amount. We fill the given information shown below if the screen

 After filling it we then click on the Save button or press Alt + S button to save the Quote.


Opening An Existing Quote:
 To open an existing Quote we click on thebutton the following screen will be appear

We select the desired account from the list and then by choosing it click on the OK button the Quote will then be shown in the screen and we can add any detail or want to do any amendments in it can do it.

 Converting Quote To Sales Order:

When the customer determines that he or she wants to purchase the item from us then we can then convert the Quote to a Sales order or an Invoice the method to convert A Quote to Sales Order is easy we select the Customer ID which we want to convert then we click on thebutton as shown in the above of the following screen.


After clicking on thebutton the following screen will be appeared


We select the Sales Order by checking it and give an invoice number and then by clicking on the OK button the Quote is transferred to the Sales Order Number.

23 December 2011

How To Default the Settings of Inventory in Peach tree

Making Inventory Adjustments

Inventory stores information for various types of items, services, and activities that we buy and sell. Inventory defaults are used as the initial settings for new inventory items. Therefore, these settings should match the most common settings for our inventory items. We can set up both default and specific inventory information. Default information is good for all of the items we set up, but each item will need special treatment too. Inventory Default Information the Inventory Defaults window lets us tell Peachtree if we want to allow duplicate values for a couple of fields, how we want to be warned regarding low stock situations, what default account numbers will be used for different types of inventory items, what default costing method Peachtree will use for items, what shipping methods we use and how we tax items, and what price levels and pricing structures we want to use. Finally, if there are special terms we use to identify our items, we can set them up as custom fields. When inventory items are set up, we can overwrite the default settings if necessary. Shipping methods used in Accounts Receivable and Accounts Payable transactions, as well as the freight account used for customer invoices, are also entered as part of inventory defaults.

To maintain Inventory Defaults we first open an existing company on Peachtree software, after opening an existing company the following screen is shown in our peach tree software


After opening an existing company we then click on the Maintain menu bar which is on the above screen of the peach tree and after clicking on the Maintain menu the dropdown list will be opened. We click on the Default Information Tab as shown below


After moving the cursor in the Default Information options another dropdown list appears from which we click on the Inventory Items option so that the following Inventory Default screen will be appeared in the peach tree software screen

  
The Inventory Item Defaults window is used to enter basic information that applies to most of your inventory items. As we can see there are main five options in which we can enter the Inventory Item Default information. These options include:
·        General Tab
·        GL Accounts/Costing Tab
·        Taxes/Shipping Tab
·        Custom Fields Tab
·        Price Levels Tab
Each tab is described below:

GENERAL TAB
When we select the Inventory Item Defaults window, the General tab appears as shown below.


·        UPC/SKU
On this window, we can specify to allow duplicate numbers for UPC/SKU and Part Numbers.


·        Quantity Available
Include purchase orders when calculating the quantity available: Select this check box to include items on purchase orders when calculating quantity available.


·        SALES INVOICE/RECEIPT OUT OF STOCK WARNING MESSAGE
Choose one of the three options regarding a notice about items that are out of stock when we select them in Sales Invoicing or Receipts.


·        SALES ORDER/PROPOSAL OUT OF STOCK WARNING MESSAGE
Choose one of the three options regarding a notice about items that are out of stock when we select them in Sales Order and Proposal entry.


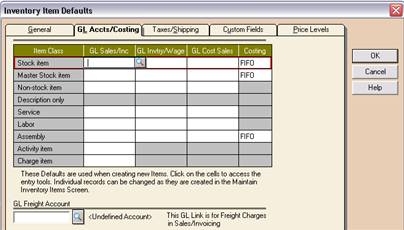
GL ACCOUNTS/COSTING TAB
On the GL Accts/Costing tab we specify several GL accounts for various types of inventory items. The default freight account is also selected on this window. We can change information for individual items when they are added through Maintain Inventory Items.

  
Each field on this tab is described below:

Item Class: Each inventory item is assigned to an item class that defines the way the inventory item is used in Peachtree. Quantity on hand and cost are tracked for stock and assembly items only. There are a variety of item classes available to encompass the needs of many different kinds of businesses. Each item class is described below:
Ø  Stock item: The traditional inventory item that is bought and sold. Quantities, costs, vendors, minimum stock levels, and other values are tracked for stock items.
Ø  Master Stock item: A special item that does not represent inventory we stock but rather contains information shared with a number of sub stock items generated from it. Once we generate a master item and specify its primary and secondary attributes, Peachtree will create the sub stock items automatically.
Ø  Serialized Stock Item: An item that must have a serial number associated with it and the serial number must be specified whenever the item is purchased, sold, or adjusted into or out of inventory. Costing for this type of item is specific to the individual item.
Ø  Non-stock item: This is an item that is not normally stocked. Quantities, descriptions, and unit prices are printed on invoices, but quantities on hand are not tracked.
Ø  Description only: This item class is used when we want to print text on the invoice. For example, a warranty disclaimer could be entered with this item class; and when an invoice is created, we would enter the warranty Item ID to print it on the invoice.
Ø  Service: This item class is used to simplify entry of services paid for by our company or sold to a customer.
Ø  Labor: This item class is used to simplify entry of labor paid for by our company or sold to a customer. This class can also be used to track labor cost associated with assemblies.
Ø  Assembly: This item class consists of two or more inventory items that are grouped together and sold as one unit. The components of the assembly are entered on the Bill of Materials tab. Quantities, costs, and other values are tracked for assembly items.
Ø  Serialized Assembly: Items assigned this item class are assembly items in that they are built from other inventory items, but they are also assigned a serial number at the time of assembly, and this number must be specified when the item is sold.
Ø  Activity Item: Items assigned this item class are used on employee or vendor time tickets when recording time spent performing services for a customer, for a job, or for internal administrative work. Use activity items when we plan to bill customers for reimbursable payroll expenses in sales/invoicing.
Ø  Charge Item: This item class is used for expenses recorded by an employee or vendor on expense tickets when expenses are incurred for a customer or job. Charge Items are also used to record administrative tasks within the company and employee out-of-pocket reimbursable expenses. Use charge items when we plan to bill customers for reimbursable expenses recorded on expense tickets in Sales/Invoicing. For each Item Class, select the most common General Ledger accounts to be used in the sale and purchase of inventory items. Some fields are dimmed and inaccessible for certain item classes. For example, we cannot enter General Ledger accounts for Description only items because no accounting is tracked for this item class.

GL Sales/Inc: Enter the income account to be credited for the sales price amount when the item is sold.

GL Invtry/Wage: Enter the inventory account to be debited for the purchase cost when we purchase stock items or build assembly items. This account will be credited for the compound cost when the item is sold. For non-stock, service and labor items, enter the salary or wage expense account or other expense account to be debited when the item is purchased. This account will be credited for the expenses when the item is sold. The sale of non-stock, service, and labor items will then reclassify the expense associated with the item from the original GL Salary/Wage or other expense account to the GL Cost of Sales account.

GL Cost Sales: Enter the cost of goods sold account that will be debited for the cost when the item is sold.

Costing: Enter the costing method for stock and assembly items. Peachtree tracks the cost of goods sold based on the costing method chosen for stock and assembly items only.

GL FREIGHT ACCOUNT:
Enter the account to which customer freight charges will be posted. We can select Freight Account usually for this GL Freight Account. When we click on this GL Freight tab the magnifying glass will appears, we click on the magnifier glass button and select the GL Freight account as shown in the following screen


TAXES/SHIPPING TAB

We use this tab to create up to ten ship methods that can be specified on customer and vendor records, as well as on most customer and vendor transactions. Also, we can create up to 25 different tax categories for items. We use these tax types for classifying items for sales taxes. We enter the descriptions, and indicate whether or not they are taxable. When we create an item, we will specify which tax type the item will receive. Then, when we sell that item, Peachtree will use this information to determine the sales tax on the quote, order, or invoice. We can also filter certain reports by tax type. We also type the Ship Methods here. We can then assign a ship method to each customer and vendor. That information will be transferred automatically to sale or purchase transactions associated with the customer or vendor. In the Ship Methods list, we enter the different shipping methods that we will select from when we enter transactions for our customers and vendors.


CUSTOM FIELDS TAB
Peach tree allows us to customize up to five additional fields for maintaining information about our inventory items. As with customers and vendors, we can create up to five labels for custom fields, additional information on our items that is specific to our business. We create the field labels here, and then enter specific information for each item on the Custom Fields tab of the Maintain Inventory Items window.


PRICE LEVELS TAB

On the Price Levels tab we may set up price levels according to our needs. Price levels provide a way for us to charge different prices to different customers. For instance, we can assign a price level to each customer to ensure accurate pricing. There are ten price levels that can be set up with any description we need. For Price level 1, we can choose to have the program calculate the price based on the last cost recorded. In addition, for Price Levels 2 through 10, we can base the calculation on Price Level 1.


Level Name: Enter a description of up to 14 characters that describes the pricing; for example, Distributor, Warehouse, and Retail.
Default Calculation: The text shown in this box is the result of what has been chosen in the Edit option.
Edit: Click the Edit button to open the Default Price Level Calculation window. Here, you can set up the options for calculating sales prices. This calculation will be applied by default to all inventory items, but can be customized or overwritten by a non-calculated price, if necessary, for individual items. The following screen will appeared when we click on the Edit button which is in front of any Price Level


Select the base price for the calculation. For Price Level 1, we can select Last Cost only. For other price levels, we can also select Price Level 1 as the basis. We select it according to the settings we want to adjust for the price. If we want to have Peachtree automatically round the price, select the basis for rounding and enter a value, if necessary. As shown above in the Default Price Level Calculations screen
  
1) Use: The options found in this field will differ based on which Price Level


     i.        Price Level 1: It is not available when calculating Price Level 1, this option can be chosen for Price Level 2 through Price Level 10. We can use it when we want to base the calculation on the price used for Price Level 1.
   ii.        Last Cost: We can use this for any level, choose this option to base the calculation on the last cost for the item.
  iii.        No Calculation: We can select this option if we prefer to enter a specific price rather than use a calculation. When we chose this option, the next three fields become unavailable for use.


2) And: Select to increase or decrease the amount by either a percent or an amount. Then, indicate the amount or percent in the following field.


3) Round Price: We have three options for rounding the sales price.
     i.        No Rounding: If we choose this option, the prices will be set exactly as calculated.
   ii.        Specific Cent: Choose this option to indicate the exact cent we want the price to round up to. Another field appears that allows us to enter the cent amount.
  iii.        Next Dollar: Select this option and the program will round the price up to the next dollar.


When we set up our customer records in Maintain Customers, we can specify the price level that each customer will receive. Hence, the price level feature allows us to create multiple levels for handling customers who may buy large quantities of items in contrast to those who buy fewer items. If we base the item prices on Last Cost, Peachtree will not update the price of an item automatically if the Last Cost should change. We must either use the Multiple Price Levels window in Maintain Inventory or click Recalc, or we must use the Maintain Prices routine. For instance, if the Last Cost of an item was $10 and our sales price is calculated as Last Cost*1.5, the sales price will be $15. If we purchase the item at $20, making the Last Cost $20, our sales price will remain $15 until we click Recalc in the Multiple Price Levels window in Maintain Inventory or until we use Maintain Prices to update the prices of items. We select how we want to adjust the price and what to adjust it by. If we want to have Peachtree automatically round the price, select the basis for rounding and enter a value, if necessary.
After saving all the information about inventory default the final step is to save it we when done with the Inventory Default click on the OK button hence the default Inventory information will be saved in our peachtree accounting software.