17 December 2011

How to Maintain Inventory Items


How To Maintain Inventory Items

Peachtree Inventory will keep track of the last unit cost of products which we buy for resale whether we keep these products in inventory or they are brought for specific jobs. When we create inventory items, we set up the goods and services we sell. We set a price (actually, we can set up to ten prices) at which we want to sell the product and the account we want Peachtree to adjust when we sell this item or service. But before we can set up selling prices, we need to supply basic information about the item. Before we are able to record transactions relating to inventory, we first need to set up the inventory items. To set up the Inventory Items we first have to open an existing company. The following screen will be appeared when we open an existing company.


We then click on the Maintain menu which is in the above screen of the Peachtree Accounting Software. We when click on the Maintain Menu the following screen will be appear
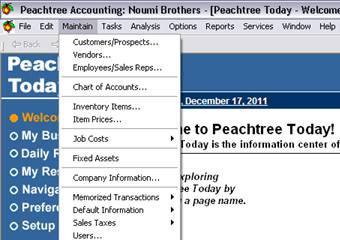

We then move the cursor of the Mouse in the Inventory Items options so that the Inventory Items box is selected as shown in the following screen


We after that click on the Inventory Item screen and the following screen will be appeared In the peach tree software screen


Peachtree Accounting lets us track inventory items both in purchasing and sales (for stock items only). When we set up an inventory item, we can establish the general ledger accounts to update with purchases and sales. If we choose, Peachtree Accounting tracks the cost of goods sold, stock levels, sales prices, and vendors for our items.

1. Peachtree displays the Maintain Inventory Items window, with multiple tabs for each item. The header information consists of the item ID, description, and class. The most important field in this window is the Item Class. There are several types of items we can use in Peachtree Accounting. These are called Item Classes and these items are shown in the Peachtree accounting software and we can select the Item from the drop down list provided. The Item Class is shown in the below given screen


The Item Class includes the following Items in it.

Stock: Inventory items we want to track for quantities, average costs, vendors, low stock points, and so on.
Non-stock: Items such as service contracts that we sell but do not put into the inventory.
Master Stock: Items that consist of information shared by a number of sub stock items.
Serialized Stock: Items that have serial numbers that we plan to track. Serialized stock items appear only in Peachtree Premium edition.
Assembly: Items that consist of components that must be built or dismantle.
Service: Services provided by the employees that we bill to our customers.
Labor: Charges we bill to a customer for subcontracted labor on that customer’s projects.
Activity: Records of how time is spent when performing services.
Charge: On-the-job expenses of an employee or vendor.
Description Only: Timesaver when we track nothing but the description.
If we save an item as a stock item, an assembly item, an activity item, or a charge item, we can’t change its item class. Although we probably wouldn’t want to, Peachtree does allow us to interchange the item class between non stock, description, labor, and service items.

We mainly choose Stock Item as we want to be able to track the most recent price paid. By choosing Stock Item, we are telling Peachtree that when this item is purchased, its price is to be recorded in the Last unit Cost field on the inventory screen. This feature allows the operator to quickly and easily look up what was paid for that item

2. After selecting the Item Class we then give the Item ID and enter a short identification code for the item of inventory. Keep in mind that the Item ID appears in lookup lists for sales transactions and so on. Peachtree allows item IDs with up to 20 alphanumeric characters. IDs are case sensitive and can’t contain the asterisk (*), question mark (?), or plus symbol (+). Then we enter the Description of the item of an inventory. This description appears in the item lookup lists.

3. Peachtree also provides the For Sales description and For Purchases description. We by clicking the arrow under description select the description we want to enter. The description is up to 160 characters, sales appear on quotes, sales orders, sales invoicing, and receipts. Where as   purchases description appears on purchase orders, purchases/receive inventory, and payments. We can modify either for sales or for purchases description when we create a transaction. Follow these steps to enter general inventory information: Entering information in the For Sales and For Purchases boxes is optional. If we do not specify a sales description, Peachtree uses the lookup description when we enter a quote, a sales order, an invoice, or a receipt. If we don’t specify a purchase description, Peachtree uses the For sales description when generating purchase orders, purchases, or payments. If a sales description doesn’t exist, Peachtree uses the lookup description.

4. Peachtree refers to the amounts that appear on the quotes, sales orders, and invoices as sales prices. The sales pricing levels correspond with those we assign for our customers in the Maintain Customers/Prospects. If we charge only one price for this item, no matter which customer, enter only Price Level 1. To enter additional sales prices, click the arrow. The Multiple Pricing Levels dialog box is shown in the below screen.


Be consistent when entering item sales price levels (for example, from lowest to highest or highest to lowest). Items prices can be a static number we assign, or we can create a calculation using the current price or the last cost as the foundation of the formula. By default, Peachtree uses the pricing calculation we entered when creating inventory defaults. We can, however, click the Edit button to display the Calculate Price Level box and create a different calculation. We can increase or decrease the price by a percentage or an amount. When we have finished, click OK twice to close both the Calculate Price Level dialog box and the Multiple Price Levels window.
  
5. In the Last Unit Cost Box, we enter the amount which we last paid for this item, this is an optional part with out this we can save an Inventory Item. After we enter transactions against the inventory item, the Last Unit Cost box becomes unavailable. Peachtree automatically updates the Last Unit Cost as we enter purchases, payments, adjustments, or beginning balances, calculating the amount based on the costing method.

6. After that we choose the Cost Method as it is a very important field. We can’t change a costing method after an inventory item is saved. Costing methods apply only to serialized items and serialized assemblies, stock items, master stock items, and assemblies. In addition to tracking serialized items and serialized assemblies by their specific unit cost, Peachtree supports three other costing methods: average cost, LIFO (last in, first out), and FIFO (first in, first out). We set all inventory items to use the same costing method.

7. In this step we select the three main accounts with out which we are not able to save the Inventory Item, these three accounts includes GL Sales Account, GL  Inventory Account and GL Cost of Sales Account. We by clicking on theoption Select the Sales account in the GL Sales Account as shown in the given screen.


After that we then again click on the option button which is in front of the GL Inventory Account and select  Raw Material Inventory Account for this GL Inventory Account as shown in the following figure


And similarly we choose Cost of Sales Account for GL Cost of Sales Account as shown in the following screen


8. After selecting the Accounts we then choose an Item Tax Type. The tax type we select applies when we enter the inventory item on quotes, sales orders, invoices, or receipts. If we assign an exempt tax type to an item, the item will never be taxed. If we assign a taxable tax type to an item, we can still exempt the item from tax at the customer or invoice level.

9. We then enter the Universal Product Code UPC or Stock Keeping Unit SKU number for our bar coded items, this is optional.

10. This step is also optional in it we enter an item type. We need this when we’re generating reports. Grouping items is much easier when they’re marked, for example, “supplies” or “raw materials.” Item types are case sensitive.

11. After entering the Item Type we then enter a storage location for the unit. This is not compulsory but may be someday we may need to know where the unit is located, such as Bin 21 or in the 5th Shelf or in the goods are store in the garage. The storage location is helpful also when doing a physical inventory.

12. We can also enter the unit of measure; this is also an optional part. We may sell our products on an individual basis (each), in pairs, per dozen, per pound or kilogram, or per ounce

13. In the Minimum Stock box, we enter the quantity at which we want Peachtree to remind us so that we can reorder the item and we have never had shortage of the item. When the quantity on hand reaches the minimum stock quantity, Peachtree prints the item on the Inventory Reorder Worksheet. Although entering a minimum stock point is optional, you need to enter a minimum stock point if you want software to automatically create a purchase order when the stock gets low.

14. Reorder quantity is the quantity we generally purchase when we order the inventory item. Entering a reorder quantity point is also optional, but we need to enter a reorder quantity if we want Peachtree software to automatically create a purchase order when the stock gets low.

15. We after selecting the Reorder quantity select a Vendor. Selecting a vendor doesn’t mean that’s the only vendor from which we purchase the item. It just means that this vendor is the important vendor and deals with us most of the time. We must supply a Preferred Vendor if we want Peachtree Software to automatically create purchase orders for reorder or for drop ship transactions and non-drop ship transactions.

16. The information can appear on the Buyer Report and can be used to select items for automatic purchase orders.

After completing the General Information about the Inventory Item we then use custom fields to store miscellaneous pieces of information about the inventory item that just don’t seem to fit anywhere else in the Maintain Inventory Items window. Examples of such items are a substitute item number, the product average shelf life, or information about an alternate vendor for the product. One of our clients uses a custom field to store the chemical makeup of each item.The Custom Field is shown in the following screen.


After entering the General and Custom Field we enter the History about the Inventory, in the History tab displays a summary of inventory transactions for stock, assembly, and serialized items for past periods. Peachtree shows units sold and received as well as sales and costs by accounting period. Peachtree does not retain history for non stock, service, and the remaining class items. The History screen of the Inventory Items are as follows.


After completing all the information we then click on thebutton which is shown in the above screen of the Maintain Inventory Items Menu. When we save the Inventory Item ID the following screen will be shown in which current balance option will be appeared through which we can enter the beginning balance of the Inventory.

We can enter Beginning Balance by opening the General Tab after saving an Inventory Item and then we click on the Beginning Balance button the following screen will be shown after clicking the beginning balance button


We first select the Item ID and after selecting it we then enter Quantity, Unit Cost and Total Cost in the given boxes as shown in the above screen and fill these boxes and after completing we then press OK button which is shown in the above screen of the beginning balance screen. This is how we can save an Inventory Item.

Deleting An Existing Inventory Account:
We can delete an existing Inventory Account By selecting the ID which we want to delete and then click on the delete button after selecting the Account which we want to delete. The Delete option is in the above Screen of the Maintain Inventory Item. But to delete an inventory item the beginning balance if saved for the inventory should be removed from the Inventory Beginning Balance Screen first then we select the inventory which we want to delete and then we Delete the vendor if we do not remove the beginning balance we are not able to delete the inventory ID and the following error will be shown

Creating a bill of materials

The bill of materials is a list of the individual parts that make up assemblies. Before we can create an assembly item, we need to make sure that each component part is set up in Peachtree. After we use an assembly on a transaction, we can’t add or remove component items from the bill of materials.

We can create a bill of materials by following these steps:

1. First open Inventory from the Maintain menu as shown above.

2. Create the inventory item ID, description, and other information. Make sure that we choose Assembly as the Item Class as shown below


3. Click the Bill of Materials tab to display a screen like the one shown below after entering Item ID, Description, GL Sales Accounts, GL Inventory Account and GL Cost of Sales Account.


Because assemblies are made up of other components, we need to use the Bill of Materials tab to list the component items. Assemblies must have at least one component (Item ID) listed in the bill of materials

4. Select or enter the first item to be included in the assembly. By clicking on the Item ID below given white tab the following screen appears


We click on thebutton which appears in front of Item ID so all the accounts which we have made in the Inventory will be appeared in our Peach tree screen as shown below


We select the Item ID and the Peachtree automatically fills in the description when we enter the Item ID as given below


5. Enter a Quantity needed to build one assembly as shown below


6. Repeat Steps 4 and 5 for each component item. If we run out of lines on the bill of materials list and have additional components, click the Add button. Peachtree inserts a blank line above the current item.

7. If we want Peachtree to print the list of the individual components on the invoice, check the Print Components on Invoice box.

8. Click Save to save the assembly item.


10 December 2011

How to Maintain the Default Settings of a Customer in Peach tree Software


How to Default a Customer:

We can default the settings of a Customer in Peach tree software by clicking on the Maintain Menu, the following screen will be appeared after clicking on the Maintain menu the maintain menu is on the top screen of the Peachtree software as shown below


After that we then move on wards to the Default Information option and click on it the following options which are given in the below screen will be shown in front of Default Information.


By selecting the Customers option the following screen will be appeared in the Peachtree Software.

In the above screen there are five main options given these are Payment Terms, Account Aging, Custom Fields, Finance Charges and Pay Methods
In Payment Terms first we have to select the Standard Terms. Terms describe how long the customers gives us to hold a bill before he pay it and how we want Peachtree to respond if Customers offer us a discount for paying early. We choose from these 5 standard terms the best that describes the terms most of our customers offer to us.
These five terms includes
1) Cash on Delivery (C.O.D.): Paid when goods are being delivered 
2) Prepaid
3) Due in number of Days
4) Due on day of next month
5) Due at end of month
We select the Standard Terms according to our Customers. We then Sets Default Terms for purchases, or Default for Credit Limit As we select an option button on the left, the boxes on the right side change . For example, if we choose C.O.D, or Prepaid, only the Credit Limit box on the right remains available, because none of the other boxes apply. 2/10 n/30 is the standard term which Is used when we gives or have been given a discount, if we pay the amount with in 10 days we can get 2 percent discount otherwise we have to pay the full amount in 30 days. We can change the Term according to our requirement.
We then select the GL Sales Account in which we mainly use Sales as an account similarly we do the same for the Discount General Ledger Sales Account as we are giving the discount so the discount is our expense we record Discount Paid in front of Discount GL Account. As shown below


If we do not have created an account of Discount in the Maintain Chart of Accounts Menu we can make an Account by clicking on the New button which is shown when we open a magnifying glass we then save the discount Account the process is shown in the below given screen.


and by closing the Maintain charts screen we will be back in the Default Customers screen we select the Discount Received option in front of Discount GL Sales Account. After filling all the information the word used in front of GL Sales Account and Discount GL Account that is Undefined Account is removed and is changed with the new Accounts as shown below


After selecting the payment terms we then move onwards to our next step which is Account Aging. Accounts receivable aging works the same as accounts payable aging — that is, we can choose to age by due date or by invoice date. Suppose that we post an invoice as of February 20, 2007, with terms of 2% 10, Net 30 Days. If we set up accounts receivable aging to age by due date, the invoice is due 30 days from the invoice date of February 20, which is March 22. On the Accounts Receivable Aging report, the invoice appears to be somewhere between 0 and 30 days old — that is, on March 31, 2007, the invoice is somewhere between 0 and 30 days past the due date of the invoice. Alternatively, if you set up accounts receivable aging to age by invoice date, the same invoice appears on the Accounts Receivable Aging report to be somewhere between 31 and 60 days old. That is, on March 31, 2007, the invoice is somewhere between 31 and 60 days past the invoice date of the invoice. This report is not showing us what is past due; it is showing that the age of invoices based on the number of days past either the due date or the invoice date. Many people choose to age customer invoices by invoice date because the aging report then reflects how old the invoice is. Others prefer to age invoices by due date so that they can see how many days the invoice is overdue.


We in this Custom Fields option select the most important information about Customers. Custom fields are a great way to store information about the customers that doesn’t fit elsewhere in Peachtree, such as details specific to the business or industry. For example, many businesses track a workers compensation certificate number for subcontractors to justify not covering the subcontractor on the company’s workers compensation insurance. On the Custom Fields tab of the Customer Defaults dialog box, we are able to create up to five fields for each customers as shown below. If we want to choose less then five Custom Fields we then click on the Tick button under the heading of Enabled Menu and press it, by doing so we can choose three or four Taps for recording the important information of the customers. In the Uncheck option we can not record the information of the customer.


Then we decide about the finance that how can we Charge the Finance. We enter the information about days overdue up to $, Annual Interest Rate, record On balances above that, Minimum finance charge. We also choose the Finance Charge GL Account in it.


After setting the default information about Finance Charges we then select the payment methods of the customers as shown below. The Payment methods may includes Cash, Check, VISA Card, Master Card or many other methods through which we can receive the amount from our customers. We enter the Available Payment Methods which we want our customer to send us the amount through these methods.


By selecting all the above given five tabs of Customers default i.e. Payment Terms, Account Aging, Custom Fields, Finance Charges and Payment Methods we then click on the OK button.  That is how we maintain Default of a Customer in Peach tree accounting software.

How To Default Vendors Account in Peach tree Accounting Software


How To Default Vendors
We can maintain the default settings of a Vendor Account in Peach tree software by clicking on the Maintain Menu the following screen will be appeared after clicking on the Maintain menu which is on the top screen of the Peachtree software.

After that we then move on wards to the Default Information option and click on it the following options which are given in the below screen will be shown in front of Default Information.
               
By selecting the Vendors option the following screen will be appeared in the Peachtree Software.


Vendor Default option shows four main options which includes Payment Terms, Account Aging, Custom Fields and 1099 Settings.
In Payment Terms first we have to select the Standard Terms. Terms describe how long the vendor gives us to hold a bill before we need to pay it and how we want Peachtree to respond if Vendors offer us a discount for paying early. We choose from these 5 standard terms the best that describes the terms most of our vendors offer to us.
These five terms includes
1) Cash on Delivery (C.O.D.): Paid when goods are being delivered 
2) Prepaid
3) Due in number of Days
4) Due on day of next month
5) Due at end of month
We select the Standard Terms according to our Vendors. We then Sets Default Terms for purchases, or Default for Credit Limit As we select an option button on the left, the boxes on the right side change . For example, if we choose C.O.D, or Prepaid, only the Credit Limit box on the right remains available, because none of the other boxes apply. 2/10 n/30 is the standard term which Is used when we gives or have been given a discount, if we pay the amount with in 10 days we can get 2 percent discount otherwise we have to pay the full amount in 30 days. We can change the Term according to our requirement.

We then select the Purchase Account, in Purchase Account tab we mainly use Inventory Account so we by clicking o the magnifying glass choose the Account from the list, as shown in the below screen

We do the same for the Discount General edger Sales Account as we are receiving the discount so the discount is our income so we record Discount Received in front of Discount GL Account. If we don not create an account of Discount in the Maintain Chart of Accounts Menu we can make an Account by clicking on the New button which is shown when we open a magnifying glass we then save the discount and by closing the Maintain charts screen we will be back in the below screen and then we select the Discount Received option.


After filling all the information the word used in front of Purchase Account and Discount GL Account that is Undefined Account is removed and is changed with the new Accounts as shown below

After selecting the payment terms we then move onwards to our next step which is Account Aging. Accounts receivable aging works the same as accounts payable aging — that is, you can choose to age by due date or by invoice date. Suppose that you post an invoice as of February 20, 2007, with terms of 2% 10, Net 30 Days. If you set up accounts receivable aging to age by due date, the invoice is due 30 days from the invoice date of February 20, which is March 22. On the Accounts Receivable Aging report, the invoice appears to be somewhere between 0 and 30 days old — that is, on March 31, 2007, the invoice is somewhere between 0 and 30 days past the due date of the invoice. Alternatively, if you set up accounts receivable aging to age by invoice date, the same invoice appears on the Accounts Receivable Aging report to be somewhere between 31 and 60 days old. That is, on March 31, 2007, the invoice is somewhere between 31 and 60 days past the invoice date of the invoice. This report is not showing you what is past due; it is showing you the age of invoices based on the number of days past either the due date or the invoice date. Many people choose to age customer invoices by invoice date because the aging report then reflects how old the invoice is. Others prefer to age invoices by due date so that they can see how many days the invoice is overdue.


After completing the Account Aging we then move towards the Custom Fields as shown in the below screen;

We in this Custom Fields option select the most important information about Vendors e.g. Custom fields are a great way to store information about the vendors that doesn’t fit elsewhere in Peachtree, such as details specific to your business or industry. For example, many businesses track a workers compensation certificate number for subcontractors to justify not covering the subcontractor on the company’s workers compensation insurance. On the Custom Fields tab of the Vendor Defaults dialog box, you can create up to five fields for each vendor. Check a box and, in the Field Labels boxes, type identifying labels for the information you want to store. After completing the step of Custom Fields we then move on to the Last step which is 1099 settings. The screen shown in the 1099 Settings is given below.

As this is not used in Pakistan so we do not use this step, So that is how we at the end by clicking on the Ok button can get the default settings which we want to save in default Vendors

Maintain Vendor Account in Peach tree Software


How To Maintain Vendors Account

To Maintain Vendors in Peachtree we open an existing company and then click on the Maintain menu which is in the above screen of the Peachtree software.


We then Select the 2nd option that is Vendors… as we want to maintain Vendors.

By selecting the Vendor… option the following screen will be appeared in the Peachtree software.

In Maintain Vendors Menu we maintain the records of our vendors by giving them ID and Name and provide the information of the vendors which includes there General Information, Purchase account to use each time we post a purchase from the vendor, and custom field information. We can also view historical information about our purchases from the vendor for the previous 12 months.  

Similar to the Customers before we save the ID of the Vendor and Name of the Vendor we first have to record the Purchase Account which is on the Purchase Defaults Menu.

As mention above we first go to the Purchase Default menu and then we click on theoption by doing this all the accounts which we have created in Chart of Accounts appeared in the screen as shown below

 We select Inventory account from it and then double click on the Inventory so that the account will be appeared in front of the Purchase Account now we are able to save the Vendor’s Name and ID. But this whole process will be done before every time we want to save the New Vendor information. If we do not record the Purchase Account and try to save the Vendors ID and Name of the vendor and other information about the vendors the software will give the following error so to avoid this we first have to record the Purchase Account.


To avoid this error we can save the Purchase Account and choose a Inventory Account for Purchase Account and save it in the Vendor’s Default Account, so that we will not need to select an account for Purchase Account every time in order to save New Vendors Information.


After selecting Purchase Account we then enter the Vendor ID and Name of the Vendor. The ID of the Vendor may be the name of the Vendor but we here take Vendor ID as 100. We then enter the Contact Number of the Vendor through which we can contact the vendor then Account No. of the vendor, His/Her Address, City, State, Zip Code, Country Name of the Vendor, Vendor type,1099 Type, Telephone Number, Fax Number, E-mail Address and Website Address of the Vendor.
Vendor Type are used to categorize vendors for reporting purposes. For example, we want to distinguish between vendors who supply us with inventory and vendors who provide overhead services such as telephone.  The text we enter in the Vendor Type text box can be up to eight characters long. Entering a vendor type is useful because we can limit some reports to specific vendor types.
1099 Type:  Peachtree’s 1099 utility allows you to print end 1099 forms for 1099-type vendors. The total amount of cash paid to a vendor for the entire calendar year is the amount that prints on the 1099 form. 1099 forms are required for independent contractors that have received payments from a business and also for vendors that have received interest payments. Both the 1099-MISC and 1099-INT preprinted forms can be printed in Peachtree Accounting. The forms can be obtained from Peachtree Checks and Forms. According to Internal Revenue Service (IRS) rules, you must issue a 1099 to a vendor who is an independent contractor if the contractor is not incorporated and you pay $600 or more per year to that vendor. Peachtree can print 1099s at the end of the year for vendors you designate as 1099 vendors. Sales representatives might be considered 1099 vendors, based on the IRS definition of employees and independent contractors. This 1099 Type is based on American System so we can not use this in Pakistan.
E-mail and Web Site: Both e-mail and Web addresses are interactive, So, if we give the vendors e-mail address and click the icon next to the e-mail text box, Peachtree opens our e-mail program and starts a message to the vendor. Similarly, clicking the button next to the \web Site text box launches our browser and directs it to the vendor’s Web site.


Beginning Balances: By clicking on the Beginning Balances we can enter unpaid bills we received from Vendors before we started using Peachtree. Technically, we can enter as many beginning balances bills we want for an individual vendor; however if we exceed 100 bills, we can enter but not edit or delete any information for the 101st bill and onward bills. If we click the Current Balance button, Peachtree displays the Vendor Ledger report for the current vendor’s balance as of the specified date.

We After filling General information about the Vendors go towards the second Information link that is Purchase Defaults and is shown in the following screen.


In this we record the information of Purchase Representative, Purchase Account, Tax ID Number, Ship Via, Terms and Delivery Method. Purchase Representative: An employee can serve as a purchase representative.
Purchase Account: As we mentioned in start of this topic that we select Inventory for Purchase Account and without selecting Purchase Account we will not be able to save the Vendor’s information.
Tax ID #: If the vendor is a 1099vendor, supply the vendor’s Tax ID number, which eventually appears on the 1099 will be written. In Pakistan Tax ID Number is not used.
Ship Via:  After it we select a shipping method from the Ship Via drop-down list. In ship via we record the method we are going to receive the inventory.
Terms: 2/10 n/30 is the standard term which Is used when we give discount to any one which means if we pay the amount with in 10 days we can get 2 percent discount otherwise we have to pay the full amount in 30 days. We can change the Term by clicking on the button the following screen will be appear when we click on the  button.


We can change the Standard Terms by un checking the Use Standard Terms and  can change the Discount Term
.
Form Delivery Option:  We then select the Form Delivery option i.e. weather we are using e-mail or paper form in this regard.

After completing the Purchase Default Information we move towards the Custom Fields Tab the tab is shown in the following screen


On the Custom Fields tab, fill in the information about the Vendor we can change these Field Labels and can be enabled on the vendor default window. In the above we fill the Information about the Vendor’s Office Manager, Account Representative and Special Note.


We after completing Custom Fields go to the option History of the vendors the Vendors screen is shown in the following screen


We then saving all the Information regarding Vendors can record the Beginning Balance of the Vendor and the procedure for recording beginning balances of a vendor is shown below:


How To Enter Beginning Balance

As we want to enter the Beginning Balance of the Vendor we have to save the ID and Name of the Vendor. We after recording all important information about our Vendors then SAVE the vendors account by clicking on the button which is shown in the above screen of the Maintain Vendors Menu. When we save the Vendor ID the following screen will be shown in which current balance is also given while when we do not save the ID of a Vendor Current Balance option is not shown.

         
We then by clicking on theoption can enter the beginning balance of a customer. As shown in the following screen.


First we enter the Invoice Number, and then we enter the Date. The date starts with the month i.e. firstly we record month then date and then year e.g. for entering June 20, 2009 we enter 06,20,2009. Then after entering Date we write Purchase order number, Amount and then A/P Account in which we select A/P account from the charts of accounts.

Delete an Existing Vendor ID
                  
We can delete an existing Vendor Account By selecting the ID which we want to delete and then click on the delete button after selecting the Account which we want to delete. The Delete option is in the above Screen of the Maintain Vendors. But to delete a vendor account the beginning balance if saved for the vendor should be removed from the Vendor Beginning Balance Screen first then we select the customer which we want to delete and then we Delete the vendor if we do not remove the beginning balance we are not able to delete the vendor ID and the following error will be shown


Change ID of A Vendor
         
We can change the existing ID of a vendor by giving it another ID that is done by clicking on the Change ID option which is on the above screen of the maintain vendor. We first select the Vendor whose ID we want to change we then by selecting the customer click on the button. The following screen is shown after clicking thebutton.


We Enter the New Vendor ID e.g. 150 is the new ID which we want to give to the Vendor we write it in front of the Enter New Vendor ID option and then click the OK option that is how we can change our Vendor ID.